Here's How  Tutorials
  • Home
  • Applied Design, Skills & Tech
  • Copyright/Privacy
    • Example Privacy Forms
  • Digital Citizenship
    • Internet Safety
    • Online Bully Prevention
  • Archived Pages
    • Engaging Digital Learner >
      • Engaging the Digital Learner 14-15
      • Engaging the Digital Learner 13-14
    • DLCoach Blog >
      • DLC Pro-D
      • DLC 14-15
    • COWs
    • SD35 Blogs
    • iTunesU Creation >
      • 1-Instructor Bio
      • 2-Course Icon
      • 3-Course Info
      • 4-Course Elements
      • 5-Creating Outline
      • 6-Creating Posts
      • 7-Adding Materials
      • 8-Publishing to SD35 iTunesU
      • Adding Text to Image
      • Upload Design Thinking Challenge
  • Inquiry
  • iPads
    • Apps
    • Teacher iPads
  • iPhones
  • Office 365
    • * Microsoft Training Centre
    • Teams Help
    • 365 Excel
    • 365 Word
    • SD Download MS Office
    • OneDrive
    • One Note
    • 365 PowerPoint
    • SD35 Student Log in
  • Pro-D
  • Tek Tool by Area
    • Augmented Reality
    • Communication Tools
    • Create/Present Tools
    • Functional Tools
    • Making Learning Visible
    • Numeracy Tools
    • Oral Lang.
    • Simulations
    • Website Creation
    • Writing Tools

Learning with Technology

6/6/2016

0 Comments


By Craig Messere, DLCoach at Simonds elementary

​Simonds Elementary is a K-5 school with an enrolment of about 140 students. Although we are a smaller school, we have been towards providing big opportunities for our students to work with technology.
 
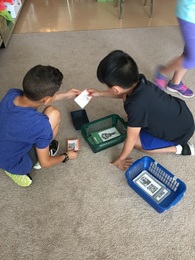
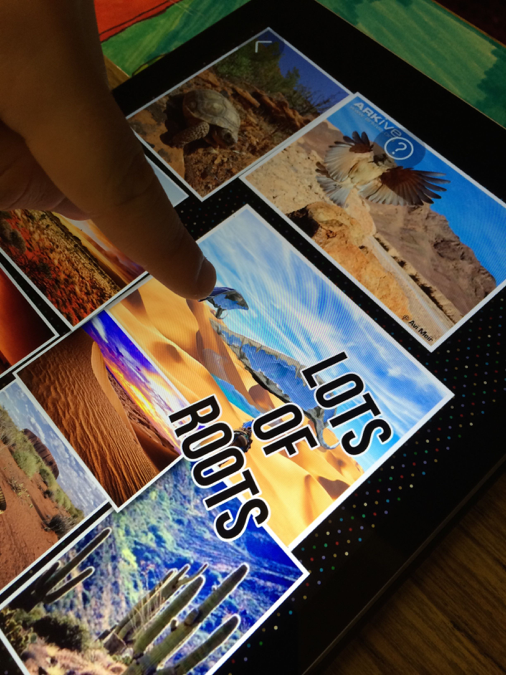
We are fortunate enough to have a class set of iPads at our school. Many teachers use these iPads to enhance support in reading, writing, math, and research projects. That being said, we have also had the opportunity to teach students about various creation apps that they can use for school assignments. The primary students have learned how to use SockPuppets and Chatterpix, while intermediates have had the opportunity to use Chatterpix, ExplainEverything, GreenScreen to demonstrate an understanding of core curricular concepts. These have been used to create student-made videos on topics such as Earth Day, a  Novel Studies, and Long Division.
 
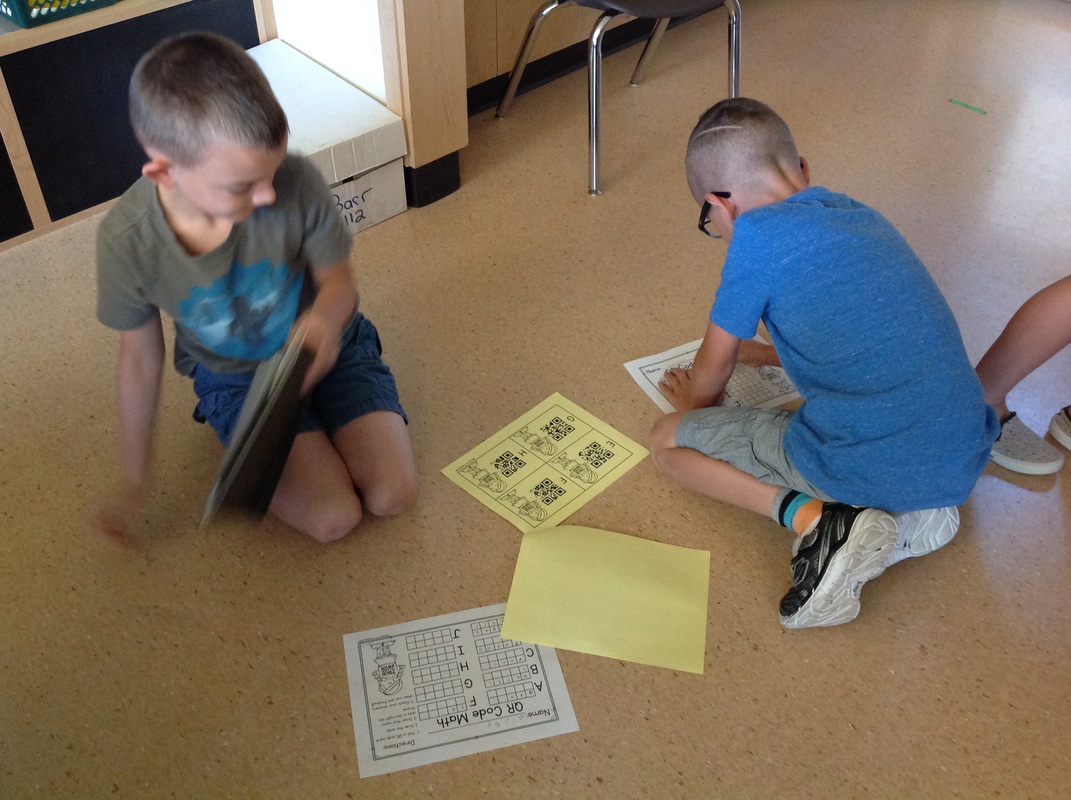
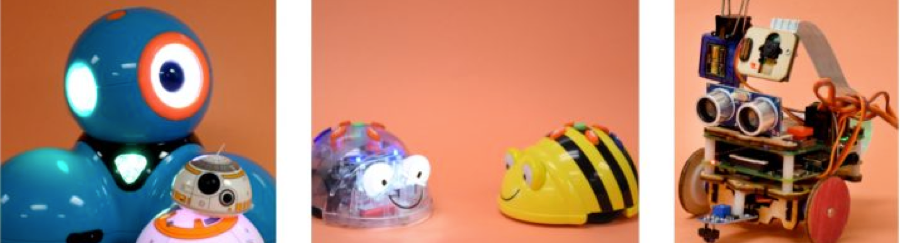
Students have also started getting the opportunity to learn more about coding. Many teachers at our school have participated in the Hour for Code. Some students have even had the chance to learn more about coding through the use of Scratch Jr. In addition to this, the resource program has recently received a Sphero SPRK with our funding, and are expecting a BeeBot to arrive shortly. Although use of robots has only been piloted in smaller groups so far, I am hoping that we will be able to implement these resources in classrooms at the start of the next school year, as a way to demonstrate how coding (or a set of instructions) can be used to “instruct” or “teach” a robot how to execute various functions.
 
I still feel that we are in the early phases in terms of implementing more technology in the classrooms. Nevertheless, the students have reacted to the new technological opportunities very favourably, and I am excited to explore these opportunities in greater depth and detail in the 2016-2017 school year.
0 Comments

QR Coding with Grades K-3

5/29/2016

0 Comments


by DLCoach, Lynn Gard from Richard Bulpitt elementary

​Using QR codes in the classroom is not a new phenomenon, but with young students it always seems to be exciting and engaging.  These two traits are part of most teachers’ repertoire of tools, but using QR codes in very young classes has proven to be very popular with the RBES students. The population at RBES has really exploded in the three years it has been opened and we have been fortunate to have technology available with a cart of mini-iPads being available for all classes to use.  Many primary teacher’s had requested that their students be taught how to use QR codes as it is relatively easy to set up and can be used either as a whole class activity or as a learning centre.   Last year a scavenger hunt was created using a QR code site and the Grades 3-5 really enjoyed it as they moved around the school finding the answers.  It was also a great activity for the students who were not familiar with all of the school’s features, such as going upstairs or going outside to the hockey box.
 
This year we have a large population of K-2 students, so QR codes were introduced to all the participating classes by first completing a simple 10 frame activity.  The rules on how to handle the iPads were kept simple and easy.  The students were required to scan a QR code that would give them a number 10 or less.  After identifying the number on the iPad, they then put a dot on a corresponding worksheet.   The students took turns in scanning the code and confirming with each other what the number was.
Picture
Picture
After becoming familiar with how to use a QR code, the students were then introduced to how to use a QR code to listen to a variety of stories being read.  This was a very popular activity in all the classes I visited.  I had purchased the QR codes that I used and cut them insto small cards and then laminated them for durability.  It would not be difficult for a teacher to create their own stories and QR codes through the many sites that are available.  As the students had used the QR code qrafter before, they had no issues with using it again to listen to the story.  As a class we discussed how to ‘x’ off the ads that appear and how to click on the URL or watch the video.  For future reference I would check if all the QR codes would work successfully before purchasing them.  The problem we ran into was that some of the QR codes take you to a YouTube site, which I didn’t want because there were sometimes inappropriate ads.  It is vitally important that you check the source of the link.  I had no problem with the products that used the Safeshare site to read their stories.
Picture

​This young kindergartner was thoroughly engrossed in the story and took a couple of cards to scan and enjoy the story being read

Picture

​A
  grade 2 student  in the above photo is enjoying a Mo Willems story being read.  Some of the stories had just the book visible and were read aloud, while others showed a person holding the book and reading it out loud.

Two kindergarten boys are trying to decide which story to listen to.  Obviously they couldn’t read the title and it was explained to them that all they needed to do was scan the card and listen to the title, but it took a little time for them to understand that at first.  A feature I would recommend for using QR codes with books is to choose or create cards that have a picture on them so that the younger students can look at the picture to help them decide what they would like to listen to.  The Clifford book series proved to be very popular as many students recognized the books.

0 Comments

Aligning Technology and Assessment

5/18/2016

0 Comments

 
by Vanessa Ayley, DLCoach @ Aldergrove Community secondary school
                                                                                               
​
Check out Vanessa's free iBook,
​ Getting Started with Technology
This year, I am striving to improve two areas in my every day teaching, increasing my use of technology and fine-tuning my assessment practices. Luckily for me, these two items can and should happily coexist. Implementing technology in a meaningful way can be a daunting feat for any teacher, especially when one considers the seemingly endless list of technologies available. I have found that through narrowing my focus on both assessment and technology and working closely with only a select handful of technologies, I have allowed for technology to become more than just a tool for engagement in my classroom, it has also helped to serve as a vital part of my assessment practice and something that has helped to streamline my teaching practice. The students seem to appreciate the variety it has given to many of our lessons. By implementing only a few tools regularly and repeatedly, I have seen an overall improvement in transition time and consequently behaviour management as the students know the tools well and are able to get right to work with little explanation or prompting. Best of all, I am able to get a grasp of what my students know and what direction we need to go next quickly and efficiently. Below, you will find a brief list of tried and true technology tools that I have regularly used to improve student learning in my classrooms this year. 

Formative Assessment Technology Tool

Picture
Formative assessment is an essential part of any every day classroom routine. It allows teachers and students to examine and analyse what they have learned and what next steps need to be taken. It allows for the students to receive feedback so that they are aware of their strengths as well as the gaps in their learning. Formative assessment should be the most common type of assessment in today’s classroom and thanks to these technology tools, being able to quickly assess student learning has never been easier or more efficient:
 
Socrative: With some initial time to set up the questions, this tool provides a wealth of information about your classes at a single glance. If students use their real name or initials on their individual devices (cell phones are sufficient), each of their responses to either multiple choice or open-ended questions is recorded in a spreadsheet that allows for quick data collection on individual students. The quizzes can be performed for a multitude of uses for example as a real time quiz as a class to review the content learned, an opening activity to assess prior knowledge before beginning a lesson, or as an exit slip to show what they have learned and any questions they still have. I found this tool to be very easy to use and I appreciate how it saves the quizzes for use in future, saving time and preparation. The limitations of this tool are that it is only moderately engaging to the students (they far prefer the competitive nature of Kahoot), and that it does require some time to set up ahead of time. 

Picture
​Plickers: Another coach has already blogged about the many benefits of this simple and engaging assessment tool; however, I couldn’t resist chiming in with some of my experiences. This tool was brought to me by my Principal, John Pusic, and I have been converted ever since. All you need is a class set of individual cards (available for download on the website), a laptop to project the questions, and an iPad or cell phone to scan the class. I assign each student a numbered card (their names are given a number on the website), which they use for the whole semester. This allows for the tracking of their results. We have used this tool as a way to assess prior understanding at the beginning of a unit or lesson, a check for understanding after introducing a new concept, and as a review tool prior to the summative assessment. The students really enjoy this tool and the questions are stored for use again in the future for future classes. The downsides of this tool are that it takes some initial setup to enter student names and questions and the website can be a little clunky until you get the hang of it.  Scanning can be a bit finicky as well especially if the classroom is set up in rows. 

Picture
Kahoot: A definite student favourite for review before a summative assessment. This technology is in no way ground breaking or new; however, I had to include it because it is so well liked by my students who ask for it nearly every week. Although I appreciate and use the multiple-choice quiz most often, this tool comes equipped with the ability to allow more open and collaborative discussion.  My biggest suggestion for both this tool and Socrative is that students are expected to use their real name so that time isn’t wasted and that you don’t end up with inappropriate emoticons displayed on the front board. If students use their real names, the results are very useful and can be downloaded as an excel spreadsheet giving you both whole class and individual information about how the class performed. 

Summative Assessment Technology Tool

Picture
​Summative assessment is something that should be used far less regularly than formative assessment. It is the way that teachers ultimately construct a grade for our students after allowing for skill building and attempts to practice using teacher feedback. Traditionally, tests, quizzes, and essays are the most common examples of summative assessments; however, I really enjoy offering variety and choice for my students to show their learning after completion of a unit of study. This allows them to work from their strengths, build their technology skills, and challenge themselves in a genuine and engaging way. I also find that they tell me a lot more than any multiple-choice test ever could as students cannot fake their way through it. The below methods I have enjoyed using for summative assessments can also be used for formative depending on the assignment and on the teacher and are in no way limited to only summative.
 
Bitstrips for Schools:  This is honestly an outstanding tool to show student learning. After using this for three semesters in Law 12, the students always respond with positive feedback. I began with a free trial and have since purchased the annual subscription, as I cannot seem to find the same benefits from the ComicLife program that the district has purchased for staff. I love that Bitstrips for Schools is meant for classroom teachers and allows you to set up classes and assignments on the websites for students to access. It comes equipped with hundreds of images, props, and backgrounds that can be used in the comics and any other image can be uploaded into the program. You can provide instant feedback and revisions to the students and can share the student’s work in a class gallery. This could be used for any course content. I have seen it been used in Science where the students upload photos to show the relationships between organisms and animals in an ecosystem. It could be used for Math to help explain common formulas. It can be used in English as a way to summarize or modernize a reading or perhaps create an alternate ending. It also fits really well with Socials as a tool to recreate a historical event and to explain the significance. The trial is a great way to see if it is for you so give it a try. 

Picture
​iMovie: I cannot even begin to say how blown away I have been by what the students can do with this application. Whether it is an individual student project or collaborative groupwork, their ability to create great edited videos with sound, music, and captions to show their learning is extremely impressive. The students have a choice to create a trailer from a provided template (check here for storyboard PDFs for each trailer http://learninginhand.com/blog/2014/8/6/plan-a-better-imovie-trailer-with-these-pdfs) or they can create a movie from scratch. As a summative piece, an iMovie does a wonderful job at showing what the students know about a given subject. This method is very user friendly and the students are pretty comfortable jumping into it without much instruction on the app itself. I have used this for a couple years for a Criminal Offences, Defences, and Sentencing unit end summative piece with great success. 

Picture

​Powtoon: Am I the only teacher who is bored to tears with Powerpoint presentations? For the students who insist on using a slideshow like presentation to show their learning, I often nudge them towards trying Powtoon for a challenge and many students thank me for it. There are two presentation modes available on the website and I strongly encourage the slides version rather than the studio version, especially if you are just getting started. 

​Canva Infographics: The days of posters and one-pagers are gone in my classroom to make way for some truly professional looking infographics. Who doesn’t love a good infographic? When I first started looking for a free infographic maker online tool, I was sadly disappointed to find some clunky not user friendly websites that truly were not free at all when push came to shove. Canva has stepped in to fill this void and I couldn’t be happier. Canva has been around for a couple years now and is a great, user friendly, drag and drop graphic maker. These infographics could be used in any classroom as a way to show student learning. I have personally encouraged their use as the presentation tool for student inquiry projects and the students who used this tool really enjoyed their end products.

 
Moving Forward: Student Portfolios
 
            As I progress through the year, I am planning to spend some time trying to find a great tool for student self-assessment and portfolio building. In today’s day and age, there is a growing importance for students to develop a positive online presence where they can compile samples of work they are proud of. As assessment in our school systems begin to change, online portfolios are undoubtedly an excellent alternative to our traditional grading system. Best of all, it allows for self-reflection and metacognition as the students select specific items that show their own personal strengths and growth in their subject areas. If anyone has any recommendations for technologies that may be helpful for online student portfolios, please contact me and let me know. Wishing you all the best in these final weeks of school. 


Picture

0 Comments

Redefining and Reinventing our School!

5/12/2016

1 Comment

 
_By DLCoach, Lorrie Burnham, @_lburnham,  from Simonds/U-Connect
Picture
​
​U-Connect has undergone some big changes this year! We started the year off with a move from our old school site at Lochiel to Simonds Elementary, where we now share a site together. This move gave us an opportunity to rethink and redesign our learning space. Before we moved we created a Pinterest account that we shared with our students, encouraging them to pin any ideas they wanted us to take into consideration during our redesign. At the end of this process we have created an amazing learning area called the “Senior Hub”.         

Picture


​It was important to us to create a space that allows students to self regulate and find a spot that works best for them to learn. This might be a traditional table and chair, or maybe it might be a bouncy chair, or a soft rug, or even a beanbag. We also added blankets and different textured fabrics for students to choose from.

Picture


​We made use of rolling walls and sliding chalkboards to create a moveable space that is open to collaboration. We can create a large learning space or move in walls and rolling whiteboards and dividers to create small nooks for group work. 

We also tried to set up different learning areas. We have a space set up for lecturing, where students sit facing the teacher. We have an area with tables that can be moved apart and together depending on the size of the group. We have a media viewing area, where students can showcase their work on the big screen. We also created a green screen space where students are free to use to record and document their learning. We are in the process of creating a Maker space. The students have really taken to this space and love “the Senior Hub”!

​U-Connect, Simonds, and H.D. Stafford had a visit from Google with theirGoogle Pioneer Expeditions Program on Friday March 4. Our students had an opportunity to participate in a virtual reality field trip using Google cardboard, a relatively new technology. The students were able to visit places like, the Palace of Versailles, Egyptian pyramids, and Coral Reefs in an immersive world experience that could be guided by the teacher. It created a group adventure that we could take together! As an educator in the 21st century, the possibilities are limitless with this technology.
Picture
Picture
Picture

​John Harris was onsite with his Imagine Reality 11 class toshowcase some of their work that they have been developing. His students are collaboratively creating immersive virtual reality gaming and curricular applications for both the Oculus and Google cardboard environments. They are also learning strategies to not only create 3D objects and virtual worlds but to also layer these objects onto real world environments designed and built with "maker-spaces" and a laser cutter. 

In my teaching career I have gone from showing my students a picture of a biome in a textbook, to putting up pictures of it on a laserdisc, to playing a video of it on YouTube, to immersing them into a virtual biome environment. It really was a game changing moment in my career!
 
As we started to plan for next year we had the opportunity to visit a very cool school in Victoria called The Pacific School of Innovation and Inquiry (PSII). This school blew our mind! It was an awesome program where students conducted all their learning via inquiry questions and projects that they designed themselves. Teachers then came alongside them and helped them to identify the learning outcomes that their projects covered. It was a very unique program where students were very engaged in their learning.
 
We were so inspired from our visit that we thought we would experiment with guided inquiry in our classes. We showed the students a YouTube video on how to create a hologram with your iPhone and ask the students to create the biggest, best hologram that they could in multi-aged groups. What unfolded before us was beyond our expectations! Students came alive and were sourcing out templates and information off the Internet. Holograms began to pop up all around the room and the energy level in the class began to explode!
It was the next sequence of events that truly inspired our passion in inquiry! Students then began to go beyond a simple template hologram. They started to invent new templates (and realized that Math played a large role in proportion). Trigonometry ratios were being discussed and protractors were being used to measure angles. The history behind holograms was being sourced out and all of this learning was being documented with pictures and video recordings. It was such an amazing day filled with excitement around learning. What made us sad was it was a one-off day and we wanted to continue this project over the course of a week! It was this moment that has defined how we will teach in the future!
​

For next year we took several ideas from our visit to PSII to implement in our school. We have decided to create a blended/online model of learning. Students will come on site to participate in afternoon inquiry projects that we will set up in the beginning as guided inquiry projects and then move to student directed inquiry projects at the end of the year. In the morning we will host tutorials and labs for core subjects such as Math, Sciences, English and Social Studies. We will also create an open block where we will create classes, week by week, based on student need. For example a class on how to create a blog, or on how to write a powerful paragraph, or how to navigate Crowd funding might be held. These classes could be student led or teacher led. Student’s core subjects will be unloaded online where students can access content and work at their own pace but can also come to tutorial times to access teacher assistance.
 
We are super excited about next year! It will be a pile of work but each of us is excited to be a part of reinventing and redefining our school model and changing lives forever along the way! Once we get our reinvented program off the ground next year we encourage you to come visit! 

1 Comment

Communicating with Parents

5/10/2016

3 Comments

 
by Jasmine Samodien, DLCoach at Langley Meadows elementary
Picture
​“It was early dismissal?”
“I didn’t know about the permission form.”
 
Despite our best efforts, communicating with parents can sometimes be perplexing. Our low tech standbys of monthly calendars, daily agendas, and notices posted in windows get the job done for many families, but there are still a number of families that miss important information. Low tech, though very simple to use, often has limitations of what can be effectively communicated. Technology has made it easier to ensure all parents receive information and to see their child’s learning. At Langley Meadows Community School teachers have been experimenting with a number of different tools this year.
 
Our all time favourite, with many teachers on board is the Remind app. It is an app that allows parents to join their phones to a teacher’s network allowing the teacher to send texts without giving out their phone number. This app has been a big hit because the message goes right to parents’ phones and doesn’t require them to have or check their email. Teachers have used it to inform parents about homework, project due dates, up coming events, permission forms, etc. Everyone has loved the simplicity and convenience of this tool.

Picture
​One of our teachers, Mrs. Randa with the support of her SEA, has decided to try communicating via Twitter for her classroom.  She has been using it to let parents know what interesting things her students have been doing in school. Parents feel that they are kept in the loop and it provides great dinnertime conversation. Mrs. Randa has enjoyed the ease of tweeting her class happenings. You can check her out @MrsRandasclass.

Picture
​A few other teachers took on the Fresh Grade pilot project. The Fresh Grade software allows teachers to take pedagogical documentation and portfolio development into the digital realm in a format that respects student privacy. One of our primary teachers is really enjoying being able to show parents the learning that their child is doing and being able to give immediate feedback for next steps and places to support the child. Parents have found it valuable as well so that they know what to except on report cards and they can see how their child is preforming learning tasks while in the classroom. 

Picture
​Finally, one teacher has giving Simply Circle a try. Simply Circle is an application that behaves similarly to Facebook, but is completely private to the parents that have been given a code to access it. It has a wall to post reminders, photos, and up coming events. It has a calendar section that can be customized with the school and class calendar of events. Parents are also able to post and message to each other to organize play dates. Two of the best features are the ability to add a volunteer sign up to an event and that you can set email reminders for future events to be sent out on your choice of dates. One of the drawbacks to the program is that parents need to sign up and if they aren’t tech savvy this was a big challenge. Another drawback is that starting next year the company wants to start charging for the service, which makes it less desirable. If you would like to check it out http://www.simplycircle.com/
 
Parent communication is always evolving and thanks to technology it is becoming easier and more convenient for many teachers. The better the communication, the better the relationship.


3 Comments

Small Steps for Teachers, Large Strides for Education

5/3/2016

1 Comment

 
​by DLCoach, Stacey Hernberg from James Kennedy elementary
​Strides in technology have made a large impact on our lives. Education systems around the world are adapting to and assimilating these significant changes. Each country, each school district, and each individual school has it’s own learning curve. I must say that I am so impressed with the staff here at James Kennedy Elementary and the steps that each and every member of our staff takes to incorporate technology in order to become a better educator and to offer more authentic experiences for students. 
 
In order to be dauntless in using technology with students, teachers must become comfortable with using technology themselves. Technology has changed so significantly over the last couple of decades that those of us who weren't born yesterday, have had to make an effort to become familiar and competent with at least some of these changes. Although there are some people who refuse to become anymore competent with technology then they absolutely have to, I do not see that with any teacher here at JKE. Each and every teacher has been brave enough to learn new tech tricks to become a better educator. Some are checking out Pinterest for new teaching ideas, most have set up class websites to communicate with parents, all have learned to connect and project in some manner or other. Some teachers use iTunesU for Educators to keep up to date. Others get their children (own and students) to show them how to use apps on the iPad.  
 
There are so many exciting learning opportunities going on here at James Kennedy. I can't possibly go into them all but I have chosen to highlight three innovative ideas that have impressed an old dog like me enough to try some new tricks. I have to say, I'm now hooked on the idea of using e-portfolios, robots, and EDpuzzle to make an impact on the education of our students. 
 
Last year, our kindergarten teachers, Kim Andersen, Loren O'Shea, Joanne Tremblay, Annie Charron, and Tracy Cramer decided to explore FreshGrade as part of their inquiry on whether it would improve their ability to communicate student learning to parents. This year, I joined the kindergarten team in using FreshGrade (FG) as both an e-portfolio of student work and as a report card. We have all found that it is a terrific tool for communicating what we are doing in the classroom and where each child is at with their learning. We can post pictures for the whole class to show parents activities like a Science demonstration, a group writing collaboration, a guest presenter or even a class demonstration of a dance. This provides parents with an insight as to what their child actually does at school and can help them further the discussion if their "what did you do at school today?" question is answered with "nothing." FG also has an announcements feature that allows a teacher to send out an announcement such as a reminder and parents will be notified via a pop up if they have the app and an email. I would say the most powerful feature of FG is the ability to post pictures and videos of a student to demonstrate where they are at with their learning. For example, we posted pictures of drawings, projects, writing samples, and assessments as well as videos of counting, reading, and answering open ended questions. These can then have a note attached to them explaining what the teacher was looking for. If you attach a learning outcome to these activities and assess them as you post them. These learning outcomes and their attached assessment will be automatically used when you create a report card for your students. We have all found FG to be such a useful tool for communicating with parents that we each plan on using it next year as well. For more ideas and information on using FG, you can follow @tracyacramer and use the hashtag #FGChat. 
Picture
EDpuzzle is a great tool for teachers looking to apply the principles of UDL or differentiate the curriculum for students. Amanda Younger, a tech savvy teacher here at James Kennedy, uses EDpuzzle with the classes she covers prep time for. She showed me the course she created for HCE Grade 6/7. First she found videos on different careers. You can use videos from a a number of sources like YouTube and Vimeo. Then she came up with questions for students to answer as they watched the videos. Students each get their own account. Then they can watch videos on the careers they are interested in at home or in class on an iPad. They then answer the questions as they pop up during the video. These questions can be multiple choice, true/false, or open ended. Students can progress at their own rate but are responsible for a minimum number of videos to be completed by a certain date. Student looking to exceed expectations are able to watch more videos. Amanda is able to go into her course at any time to see what students have completed and how they've done with the questions. Although this can take some time to set up, if it is done for a unit that will be taught more than once then the time invested should be worth it. I can see this type of unit course being quite engaging for today's youth!
Picture
​What better way to inspire students to develop inquiry and innovation skills than through robots! Through the Innovation Partnership from the Ministry of Education, our Resource teacher, Ann Pimentel has been promoting inclusion and innovation through codeable robots like the Tiddlybot (a Raspberry Pi based robot) to simple primary robots like the Bee-Bot. The Youth and Childcare Worker, Raman Dhillion and Ann facilitated a 6 week after school club for vulnerable girls called the INSPIRE Club which focused on coding and compassion. Our school has been able to participate in a Robotics Showcase, INSPIRE mini-workshops, INSPIRE curriculum series and an INSPIRE day. As Ann branched out in using 'primary robots' that do not use Raspberry Pi as the ‘brain', the project turned from the INS-PI-RE Project into the INSPIRE Project This project inspires all students to engage with robots as an opportunity to innovate and inquire into STEM (Science, Technology, Engineering and Math) subjects which compliment the new BC curriculum. The INSPIRE Project delves into Universal Design for Learning principles and actively allows students to be innovators and not just consumers of technology. My K/1 class had an INSPIRE mini-workshop and then adopted a Bee-Bot. They were enthralled with the workshop and love programing our Bee-Bot’s next moves. The INSPIRE Project has been such a success and inspiration in promoting inclusion, inquiry and innovation that the project is competing for the CST Inspired Minds Learning Project (in the Small Prize Group)! We need your votes. Voting is from Monday, May 2nd to Monday, May 16th. You can vote everyday using for our project by using Facebook, Twitter and our link: http://learningproject.cst.org/ideas/1033. If you would like to learn more about The INSPIRE Project check out Ann’s blog.
Picture
​Every learning curve starts off with a single action. Sometimes the learning starts off with a bang, but usually it starts out slow and feels that way longer than we would like. That slow frustrating part is just the foundation forming. Stick with it and eventually you will blossom.

1 Comment

Self-Regulation & Social Emotional Education @ Uplands

4/26/2016

0 Comments

 
by DLCoach, Lori Wettstein

Uplands Elementary has come a long way in technology over the past year.  Every classroom is now set up and equipped with a cart, projector and dongles.  Every teacher has his or her own iPad and laptop.  The school shares a cart of 35
iPads and a cart of 30 COWS.  We seem to work well with our schedule and everyone shares nicely.  We also have 3 carts with Apple TVs and those are shared around as needed to work wirelessly.  From the feedback I am getting, most teachers are using their technology on a daily basis.  Any troubleshooting problems come to me as needed and if I can’t help them out, we find someone who can.  We all share technology ideas out on Drop Box and during staff meetings and there are some excellent programs being used across the school.

         I want to focus this blog specifically on programs that we are using to teach students and support them in Self-Regulation and for Social Emotional Education.  The inquiry goal that Uplands has taken on as a whole staff this year is to focus on the Social Emotional piece to minimize behaviors.  Although there are several programs being used across the school to address this goal, the use of technology is playing a big role too. 
Many of the teachers are now using GO-NOODLE in order to reduce high energy and help students to calm their bodies and get ready for work.  With this program, there are a multitude of action videos to choose from with different results for each.  Students simply watch and copy the actions of the people and characters on the screen.  I use GO NOODLE everyday and sometimes up to 3 times a day when there isn’t gym.  The students LOVE the dance moves and fast paced videos in order to exert extra energy and I often put on Maximo for Yoga and slow, calming movements to help ease us into work or transitions.  Since using these programs daily, staff  have noticed an overall positive change in behavior.  Here are a few Go NOODLE photos and videos that I have taken of my students. (Please note that I sent home a permission slip to parents, allowing me to video and photograph their child and share it with fellow teachers.  Only 1 student was not allowed and I have him stand in an area out of the camera’s view.)
​This is one of my students using the rebounder that is kept out in the hallway.  I videoed him using it and he gave step-by-step directions for the appropriate way to use it.  This video was then shared with the class.  If I find a child is having a difficult time focusing or sitting still, I will ask them to go and use the rebounder.  I also send students out if they need to be up regulated.  Sharing these step-by-step videos is a great way to get the kids teaching and it brings technology into the classroom.
​This is a video of a student doing stretches and down regulation with Maximo on GO NOODLE.  Maximo is a funny little animated character that the kids enjoy following along with.
​VIDEO-We have been learning to use the SLO-MO and TIME-LAPSE options in camera.  The students enjoy filming each other in different learning activities and then watching themselves on the projector. 
Picture


​​This is a photo of my students using SMILING MIND.  It is an audio-based program that teaches the students to breathe and focus on calming techniques to down regulate. 

We also use an app called RESPIRELAX to help us regulate our breathing and calm our bodies.  Individual students use it when they need help calming and we also use it as a whole class on the projector.  This is a great calming activity right before transitions.  Settings allow you to change the speed and duration of breaths and the students simply breathe in and out at the same speed as the bubble on the screen.  This is a French language program, but I think that we all breathe in the same language.  HAHA! Here is a video of what the app looks like.
​I would highly recommend these self-regulation programs to any teacher.  Students from Grades K-7 use them at our school and there are videos to choose on GO NOODLE for all ages.  I Love using these as much as the kids-I’m getting exercise along with my students and seeing positive results in behavior.  Give them a try in your classroom!

0 Comments

The Development of Digital Literacy

4/22/2016

0 Comments

 
by DLCoach, Ryan Harris @ North Otter
​

This past year at North Otter has been an exciting, and often frustrating, journey in our efforts to develop digital literacy skills in our students. We are blessed with staff that have taken the lead to utilize technology in their teaching, as well as providing students multiple ways of expressing their learning through technology. This year has also brought to light many important questions about what student learning will look like under our new curriculum, and certain issues we are experiencing in adapting digital literacy into our classrooms.
 
Our Successes
 
In my classroom, utilizing the I-Pads to showcase student learning has been a rousing success. We began this term by focusing on PicCollage, a collage creation app that allows students to demonstrate their learning through many different tools. Our first few lessons revolved around experimenting with the app and its many features. It is incredibly user friendly and within half an hour my students were able to create multiple picture collages. Their first project was to create a collage using words and pictures that showed the different types of plants that would grow in a particular biome. 
Picture
Picture
I found PicCollage to be a great learning tool for my students. Their engagement level was high and they were able to express their learning in many different ways. It was also an app that all of my different learners could use independently and be successful.
 
 For a mapping unit in Social Studies, I had the students interact with Google Maps. To begin we learned how to use the tool and to look up addresses. After students became familiar with the software, we used Google Maps to look up our school and to create a map of the surrounding area. The students were given only slight parameters for the project (they must show the school and the surrounding area). The students were able to experiment with their maps, deciding on the size of map they would use and how to orient the map to show the greater community. I found this to be a great hands-on way to teach my mapping unit and a way for students to show some individuality in their final products.
Picture
Picture
For those interested in a great online learning program for teaching environment conservation, I highly recommend www.planetprotectors.ca. As a class students are broken up into teams, and complete online modules, with mission tasks each week. The program was interactive, and provided high interest activities that the students greatly enjoyed. It also includes at home connections for students to be completing challenges each week with their families.
 
We have also been fortunate enough to receive Digital Literacy grant this year for I-Pads; dedicated to helping our Grade 4/5 classes improve their math fluency. The project so far has revolved around students documenting their learning and teaching math concepts through video tutorials using I-Movie. Students have also began to use a great app, Explain Everything, to also document their learning.  The end goal is for students to create online portfolios, using Fresh Grade, to document their learning and to share with the surrounding school community. It is an exciting adventure that the students are enjoying thus far.
 
Our Struggles
 
            This year has also brought to light many issues we are finding when implementing technology in our classrooms. Software updates have continued to haunt us this year, with many lessons not succeeding due to Flash Player updates needing to be done, program failures or not being able to refresh our list of Apps on a continued basis. With no release time to tackle these issues for staff, it is a never-ending game of catch up that has proven to be disheartening.  Access to technology is also a limiting factor. With two cow carts of laptops and one of I-Pads to share across ten divisions, we are limited in how many times a week our students have access. With the growing dependence on technology availability that will be coming with the new curriculum, many staff are concerned about how much time with technology their students will be receiving.
 
The biggest struggle I have experienced this year, is the lack of computer knowledge our students are coming to school with. Many of our students are inexperienced with how to turn a computer on, how to save work and what the many buttons on the keyboard do. It was an eye-opening experience earlier this year, when many skills that I took for granted, needed to be directly taught to my students. It is something that I encourage all teachers to consider before delving too deep into any technology use. What skills are our children bringing to the table?
 
Where We Are Going
 
Through the experiences of this past year, I see a great need for our school to develop and adopt a K-7 digital literacy program. We are beginning to work closely with our feeder high school to discuss what skills they would like to see children arrive with in Grade 8, and how best we can implement those skills in our classrooms. Developing key computer literacy skills for each grade will help our students build up their knowledge, and, hopefully provide the skills to help them succeed in our future curriculum.
 
We are also in the beginning stages of planning Maker Space projects for our upper intermediate students, with support from technology teachers from D.W. Poppy. The goal will be for our upper intermediate students to help design and build a community garden on our grounds. Using both critical thinking and design based learning students will be responsible for planning all parts of the garden and forming connections with the high school to build many of their designs. This is hopefully the beginning of an ongoing connection our students will have with their high school.
 
It is an exciting journey that we are about to undertake, in which I am so thankful to have our DLC community to support and inspire us, in helping our students become successful digital learners. 

0 Comments

Communicating Learning Both Inside and Outside the Classroom Using Technology

3/1/2016

0 Comments


by Alice Brown's Digital Literacy Coach,  Alex Baxfield

Picture
Alice Brown Elementary is lucky to be a very technologically advanced school. We have multiple classrooms that have class sets of iPads, every classroom has a document camera and projector and we are fortunate to have the use of Apple TV in many of our classroom which opens up a variety of doors to educational experiences. Our students are blessed and have the ability to learning in a multitude of ways using technology. But how do we share all that we can do with each other and our parent community? Through some amazing tools, students at Alice Brown have been able to share some of the awesome things they have been doing in the classroom.
 
Many classrooms are using Explain Everything, an app that allows kids to do exactly that: explain everything. Since our goal as a school has been to decrease math anxiety and make math more fun, it’s been great to use it during math.
 
Recently, my grade 7s used the Explain Everything app to show what they had learned about area and circumference of a circle. I gave them some simple guidelines and sent them on their way (we have used this app multiple times throughout the year so they are confident in how to use it). The variety of explanations I got back was amazing! The kids really enjoyed explaining to how to find the area and circumference of a circle and I was able to help students who were away or struggling with the concept by showing them peer-made videos of the concept. It’s been a long time since I’ve heard “math is boring!”
 
Here’s an example of what one student produced:

he grade 5 class has even taken their knowledge of the Explain Everything app and shared what they know with our younger grades. This is awesome for building relationships across the ages and also giving our older kids a sense of pride in their accomplishments. They were able to create buddy projects where the older students guided the younger ones as they learned how to use the app and create a personalized screenplay on some of their schoolwork. The younger students now have the knowledge and confidence to create their own screenplays.
Here’s an example of a kindergarten student showing what he knows about 2D and 3D shapes:
https://youtu.be/RzbGQ7GhqAA
 
Picture
 My grade 6/7 classroom is also using Write About, an online writing community where students are able to engage in high-interest writing and they can share their ideas and writing with their peers as well as their teacher. We have discussed the proper etiquette of writing online and how to constructively comment on another student’s piece of writing and I find that my students are really encouraging. If a student doesn’t feel comfortable sharing their writing with the class, that’s ok too as there is a private publishing feature that allows only the teacher to read it. It’s a really great website for engaging students in writing as well as communicating ideas and inspirations. [Write About Tutorial}

Picture
Perhaps one of the coolest things a couple of us have done at Alice Brown this year is implement Fresh Grade into our classrooms. Fresh Grade is a pilot program that a few teachers in our district are taking part in and it is revolutionizing the way we communicate with parents. Our students are able to upload photos and videos of their work in class to a virtual portfolio and parents are able to view it in real time and even comment if they choose to. Parents no longer have to ask, “what did you do in school today?” because they know before the child comes home from school! My students even screen shot their spelling test scores and other activities and then post pictures. Plus, it’s an excellent record of the exciting events and projects that students have participated in and completed over the year. I’ve had so many positive comments from parents and the kids love that their parents are able to comment on their pictures and videos too. As a teacher, I find it extremely helpful when it comes to parent communication as I post scores to tests and large assignments on Fresh Grade. This way, parents know exactly how their child is doing academically. Parent teacher interviews are a breeze as the parents already know exactly how and what their child is doing in your classroom. Communicating with parents has never been easier.
 
We have had immense success with using multiple programs and apps at Alice Brown Elementary to communicate with the aid of technology. We are looking forward to further expanding our horizons and continuing to the challenge the way we teach and engage students. ​​


0 Comments

Plickers for all Ages

2/15/2016

1 Comment


 by Marnie Anderson, ​DL Coach @ Parkside Centennial elementary

Kristin Macki, at Parkside elementary,  shared an easy to use, effective app at a staff meeting - Plickers.  It really is the best thing since sliced bread.

How much:  FREE!
 
What technology do you need?  The teacher needs a laptop, smartphone or ipad and an Internet connection and a digital projector. The students do not need any technology – which is great.
 
What is it?  A super quick way to assess student understanding without them writing or teacher marking, (Extremely Awesome!) 

​How does it work?

Picture
1.  Sign up at https://plickers.com on your laptop and then download the free app to your phone or tablet.
 
2.  Print your scanning Plickers cards (or contact our Printshop and order 40 Plickers cards on card stock for $2.00)
 
3.  Assign each of your kids to a card.
 
4.  Create multiple choice or true/false questions to determine understanding.

5. On quiz day, hand out the cards and explain how to turn it so the correct answer is on top. 

Picture
6.  Bring up your quiz on the laptop and open the app on your phone.  Que the questions on your phone and press LiveView on your laptop. 
 
7.  I read the question out loud.  The kids turn their card to their chosen answer, then you scan the crowd with your phone or tablet.
 
8.  If the scan was successful, the box beside their name will turn blue.  (It does not show if they got it right or wrong.)
 
9.  You can see on your handheld who is right or wrong.  Finish the quiz.
​
10. On your laptop,  click reports and now you have instant assessment data, without marking a thing.   I like to group questions aimed at a particular Curriclular Competency to make assessment easier. 

​For more detailed help, go to Getting Started with Plickers.
 
Teachers love this app as it really fits in with the Universal Design for All model and students that have difficulty writing or expressing orally can fully participate with no adjustments necessary.   It can be used and would be useful at every grade level from primary to grade 12. ​
Picture
1 Comment
<<Previous

    Langley's Digital Literacy Coaches

    DLCoaches from each school will be sharing a blog entry about their staff & students' digital literacy experiences.

    Blogs by Content or by School:

    All
    1-Augmenting Reality
    1 Communication
    1 Digital Literacy
    1-Digital Literacy
    1-Green Screen
    1 Hour Of Code
    1 Interactive Learning
    1-Interactive Learning
    1 Privacy
    1-Self Regulation
    1 Storytelling
    1-Storytelling
    1 Visable Learning
    1-Visable Learning
    ACSS
    Alex Hope
    Alice Brown
    Belmont
    BGMS
    Blacklock FA
    Brookswood Sec.
    Dorothy Peacock
    DW Poppy
    ELL
    Fort Langley
    Glenwood
    Gordon Greenwood
    HDStafford
    Instructional Services
    James Hill
    James Kennedy
    Langley Fine Arts
    Langley Meadows
    LEC
    LFE
    LFMSS
    Lochiel U-Connect
    LSS
    Lynn Fripps
    Meadows
    Nicomekl
    Noel Booth
    North Otter
    Parkside
    RCGarnett
    REMSS
    Richard Bulpitt
    Simonds
    Topham
    Uconnect
    Uplands
    West Langley
    WGSS
    Willoughby
    Wix-Brown
    YCMS

    Archives

    June 2016
    May 2016
    April 2016
    March 2016
    February 2016
    January 2016
    December 2015
    November 2015
    October 2015
    June 2015
    May 2015
    April 2015
    March 2015
    February 2015
    January 2015
    December 2014
    November 2014
    May 2014
    April 2014
    March 2014
    February 2014
    January 2014
    December 2013
    November 2013
    October 2013

Powered by Create your own unique website with customizable templates.